PreOrder Guru allows you to connect your own SMTP (Simple Mail Transfer Protocol) server to send emails from your preferred email provider.
This helps ensure better email deliverability, reliability, and branding compared to default email settings.
📍 Step-by-Step Guide #
Step 1: Open SMTP Settings #
From your Shopify admin:
- Go to Apps → PreOrder Guru
- Click on General Settings
- Navigate to Email Settings
- Locate the SMTP Server Settings section
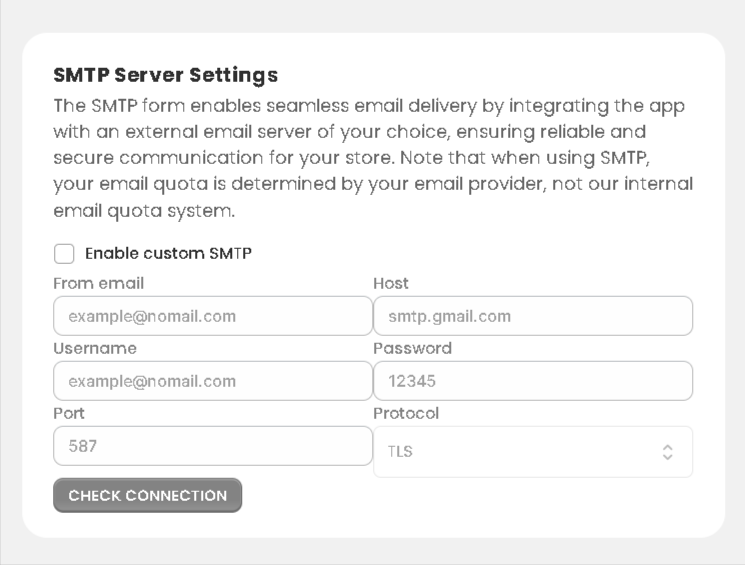
Step 2: Enable Custom SMTP #
- Toggle “Enable custom SMTP”
- This will activate the SMTP configuration fields
Step 3: Enter SMTP Details #
Fill in the required details provided by your email service provider:
- From Email
The email address used to send emails
(Example: support@yourstore.com) - Host
Your SMTP server address
(Example: smtp.gmail.com) - Username
Your email or SMTP username - Password
Your email password or app-specific password - Port
Common ports:587(TLS) or465(SSL) - Protocol
Choose the security protocol:- TLS (recommended)
- SSL
Step 4: Test Connection #
Click “Check Connection” to verify your SMTP setup.
If the connection is successful, your emails will be sent using your SMTP server.
🌐 Common SMTP Examples #
| Provider | Host | Port | Protocol |
|---|---|---|---|
| Gmail | smtp.gmail.com | 587 | TLS |
| Outlook (Office365) | smtp.office365.com | 587 | TLS |
| Yahoo | smtp.mail.yahoo.com | 587 | TLS |
| Brevo (Sendinblue) | smtp-relay.brevo.com | 587 | TLS |
| SendGrid | smtp.sendgrid.net | 587 | TLS |
| Mailgun | smtp.mailgun.org | 587 | TLS |
| Zoho Mail | smtp.zoho.com | 587 | TLS |
⚠️ Important Notes #
- Use an app password instead of your regular email password (for Gmail/Outlook).
- Make sure your email provider allows SMTP access.
- Incorrect details may cause email delivery failure.
💡 When Should You Use SMTP? #
Use custom SMTP if you want:
- Better email delivery rates
- Branded email sending (your domain)
- More control over email sending limits
💬 Need Help? #
If you need help setting up SMTP, feel free to contact our support team.
📩 We’re here to help you configure it correctly and ensure smooth email delivery.


